EBANX Dashboard
About this guide
This guide provides you an overview of the EBANX Dashboard and its main features. Control your Latin American operations in a transparent, simple and practical way. With the EBANX Dashboard, you are able to track all your transactions, generate reports, analyze data in graphic formats and much more.
What you will need
If you don't have access to the Dashboard request a call with a Business Development Executive to know our product better; otherwise, if you already have an account but do not remember your password, please click here to reset your password.
Overview Screen
The Home screen of your Dashboard, the overview section shows all data processed either combined by all Countries (if you process more than one) or by Country.
Here you will be able to:
- See your current:
- Ready for Settlement: The net amount available to be transferred to your account via settlement.
- Total Lifetime Payments and Customers: Number of total payment transactions and total number of customers your Business had while processing with EBANX.
- Check your Total Processed Volume on a graphic format:
Edit the time period you would like to see by clicking on the right corner date filter, the main set period is the last 30 days.
See Processed Volume, Payments and Unique Customers according to the date filter you have set.
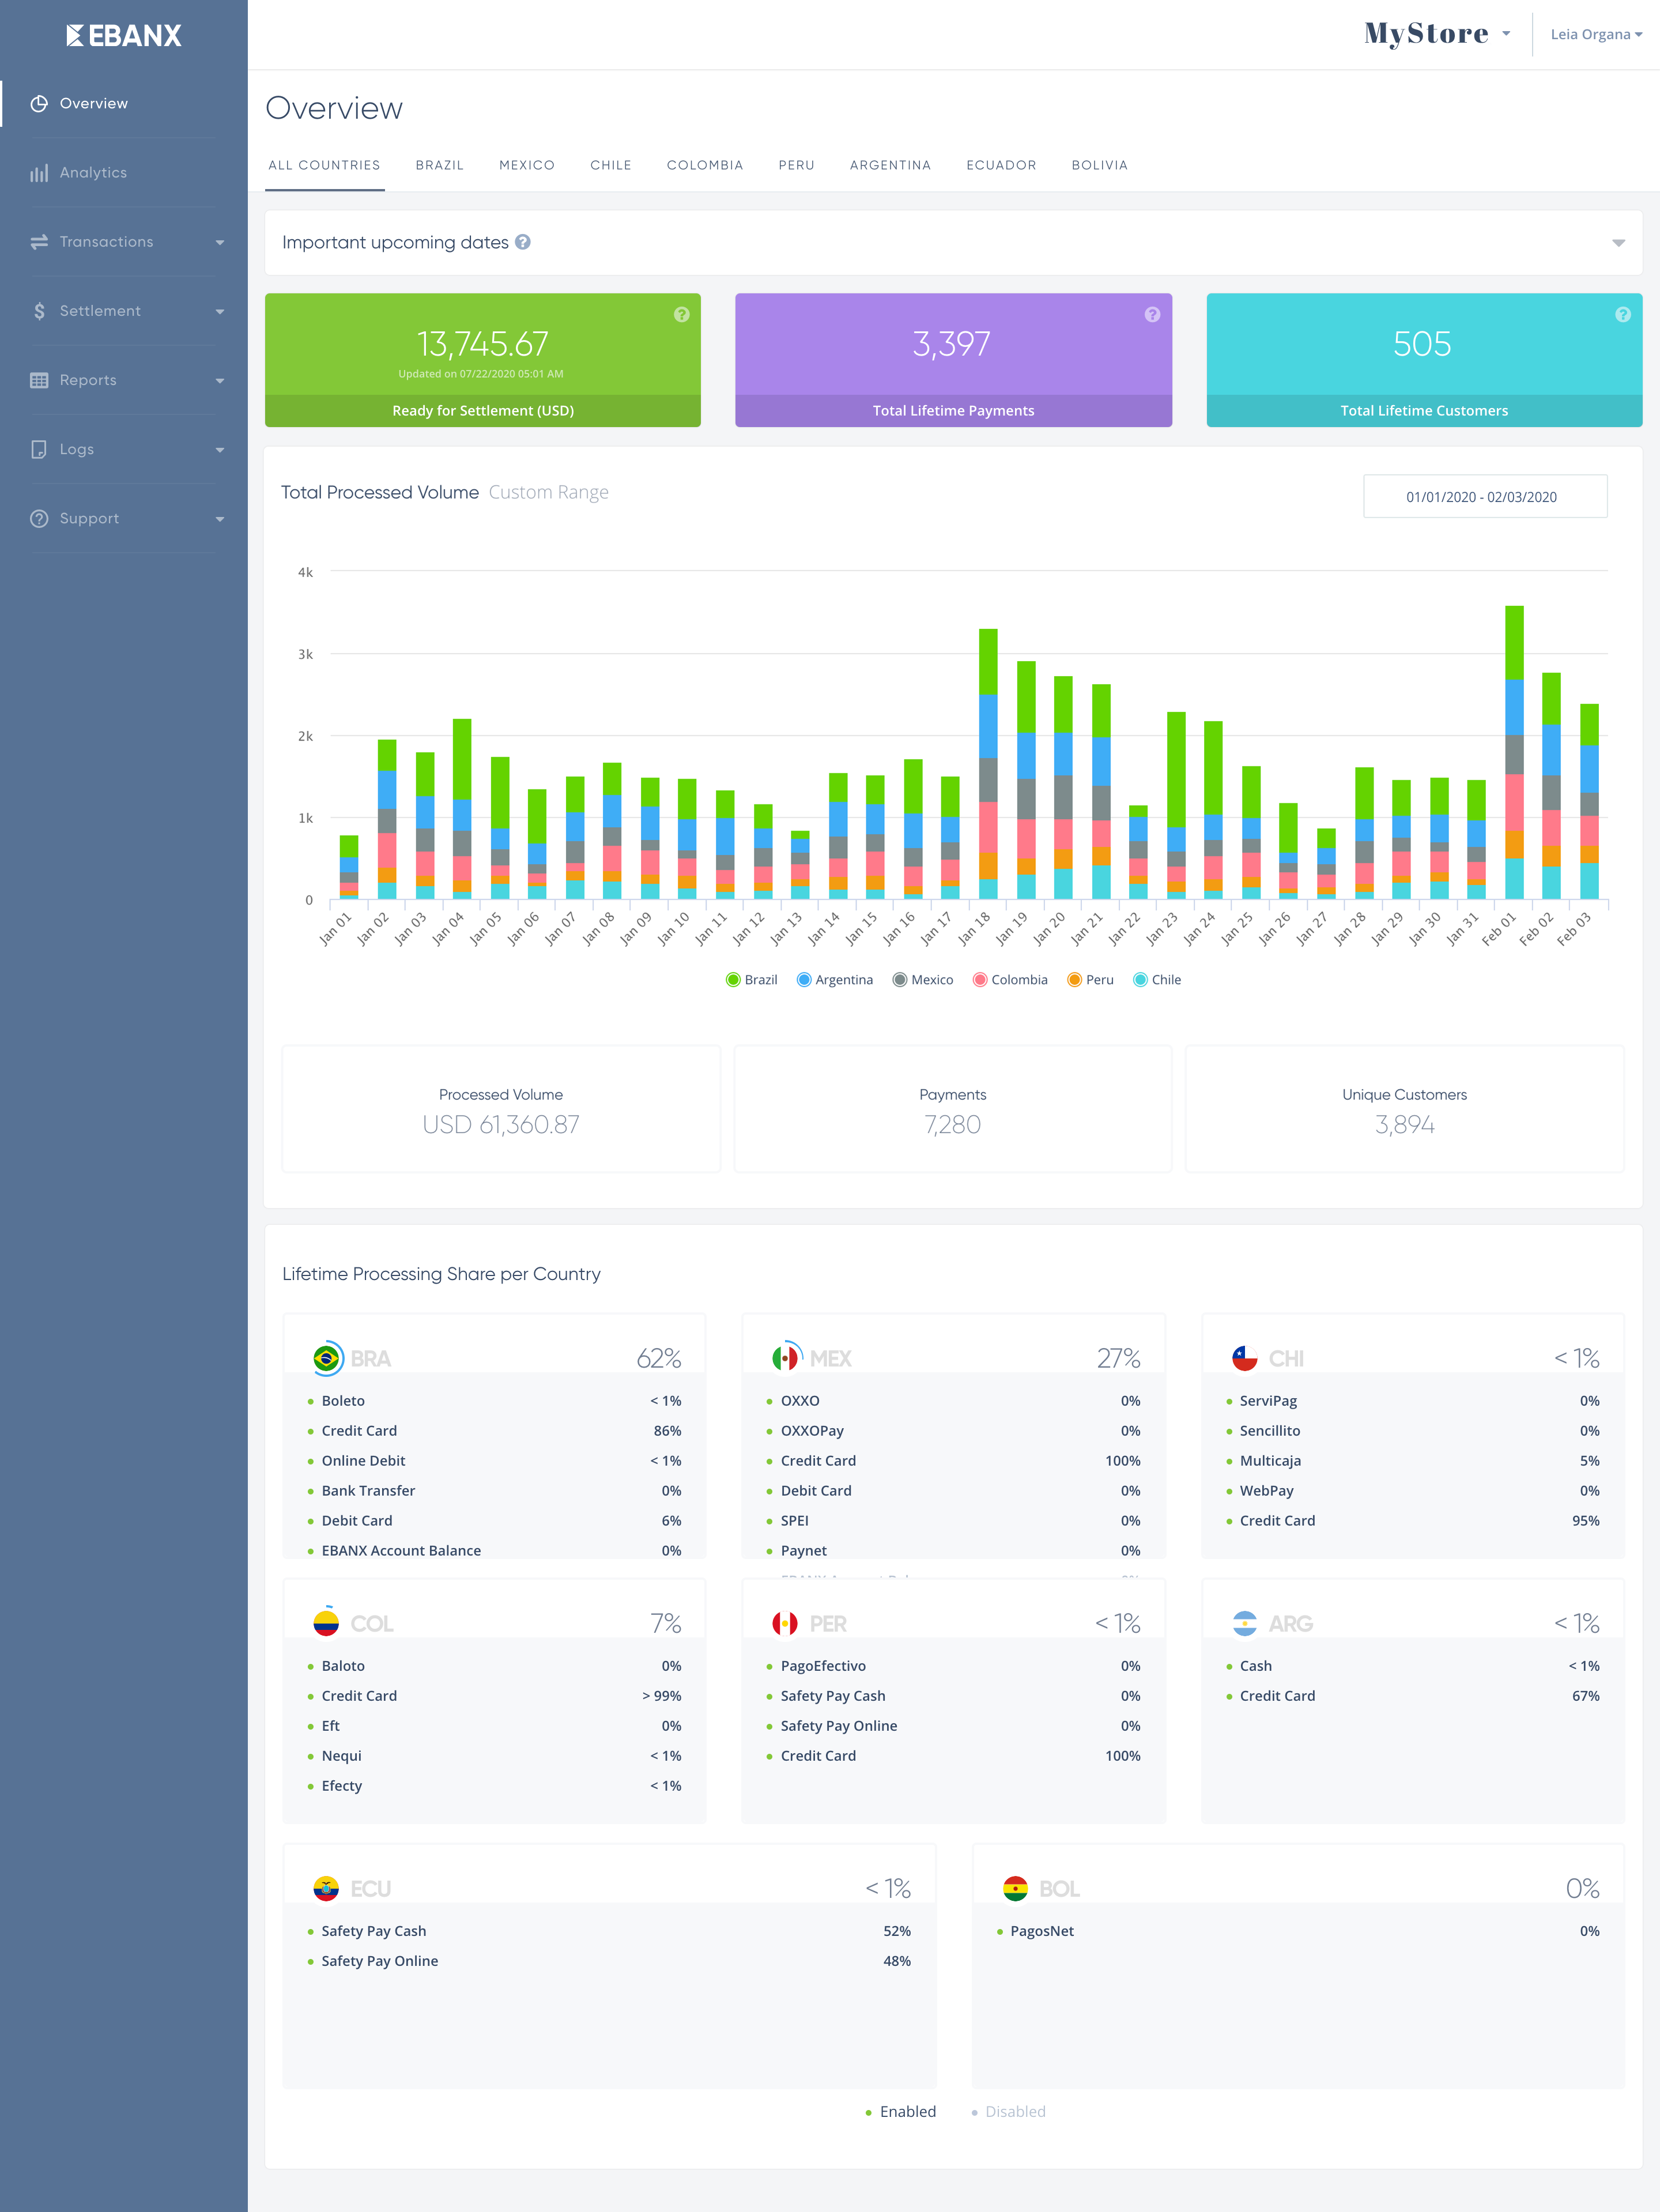
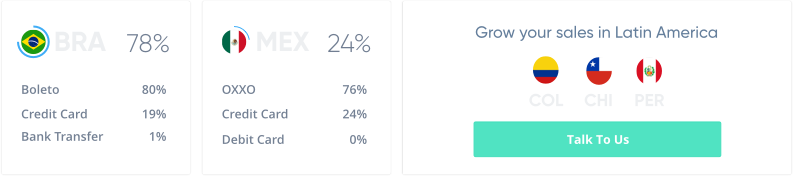
- The third section shows the Volume share of your total processed amount:
The share will be shown according by Country and by Payment method inside every Country.
If you want to start to process in other countries, click on the talk to us button and schedule a call with your Business Development Manager.
Transactions Screen
Check your Payments, Refunds and Chargebacks transactions in this menu. Read the specific menus to understand their functionalities:
Payments and Refunds
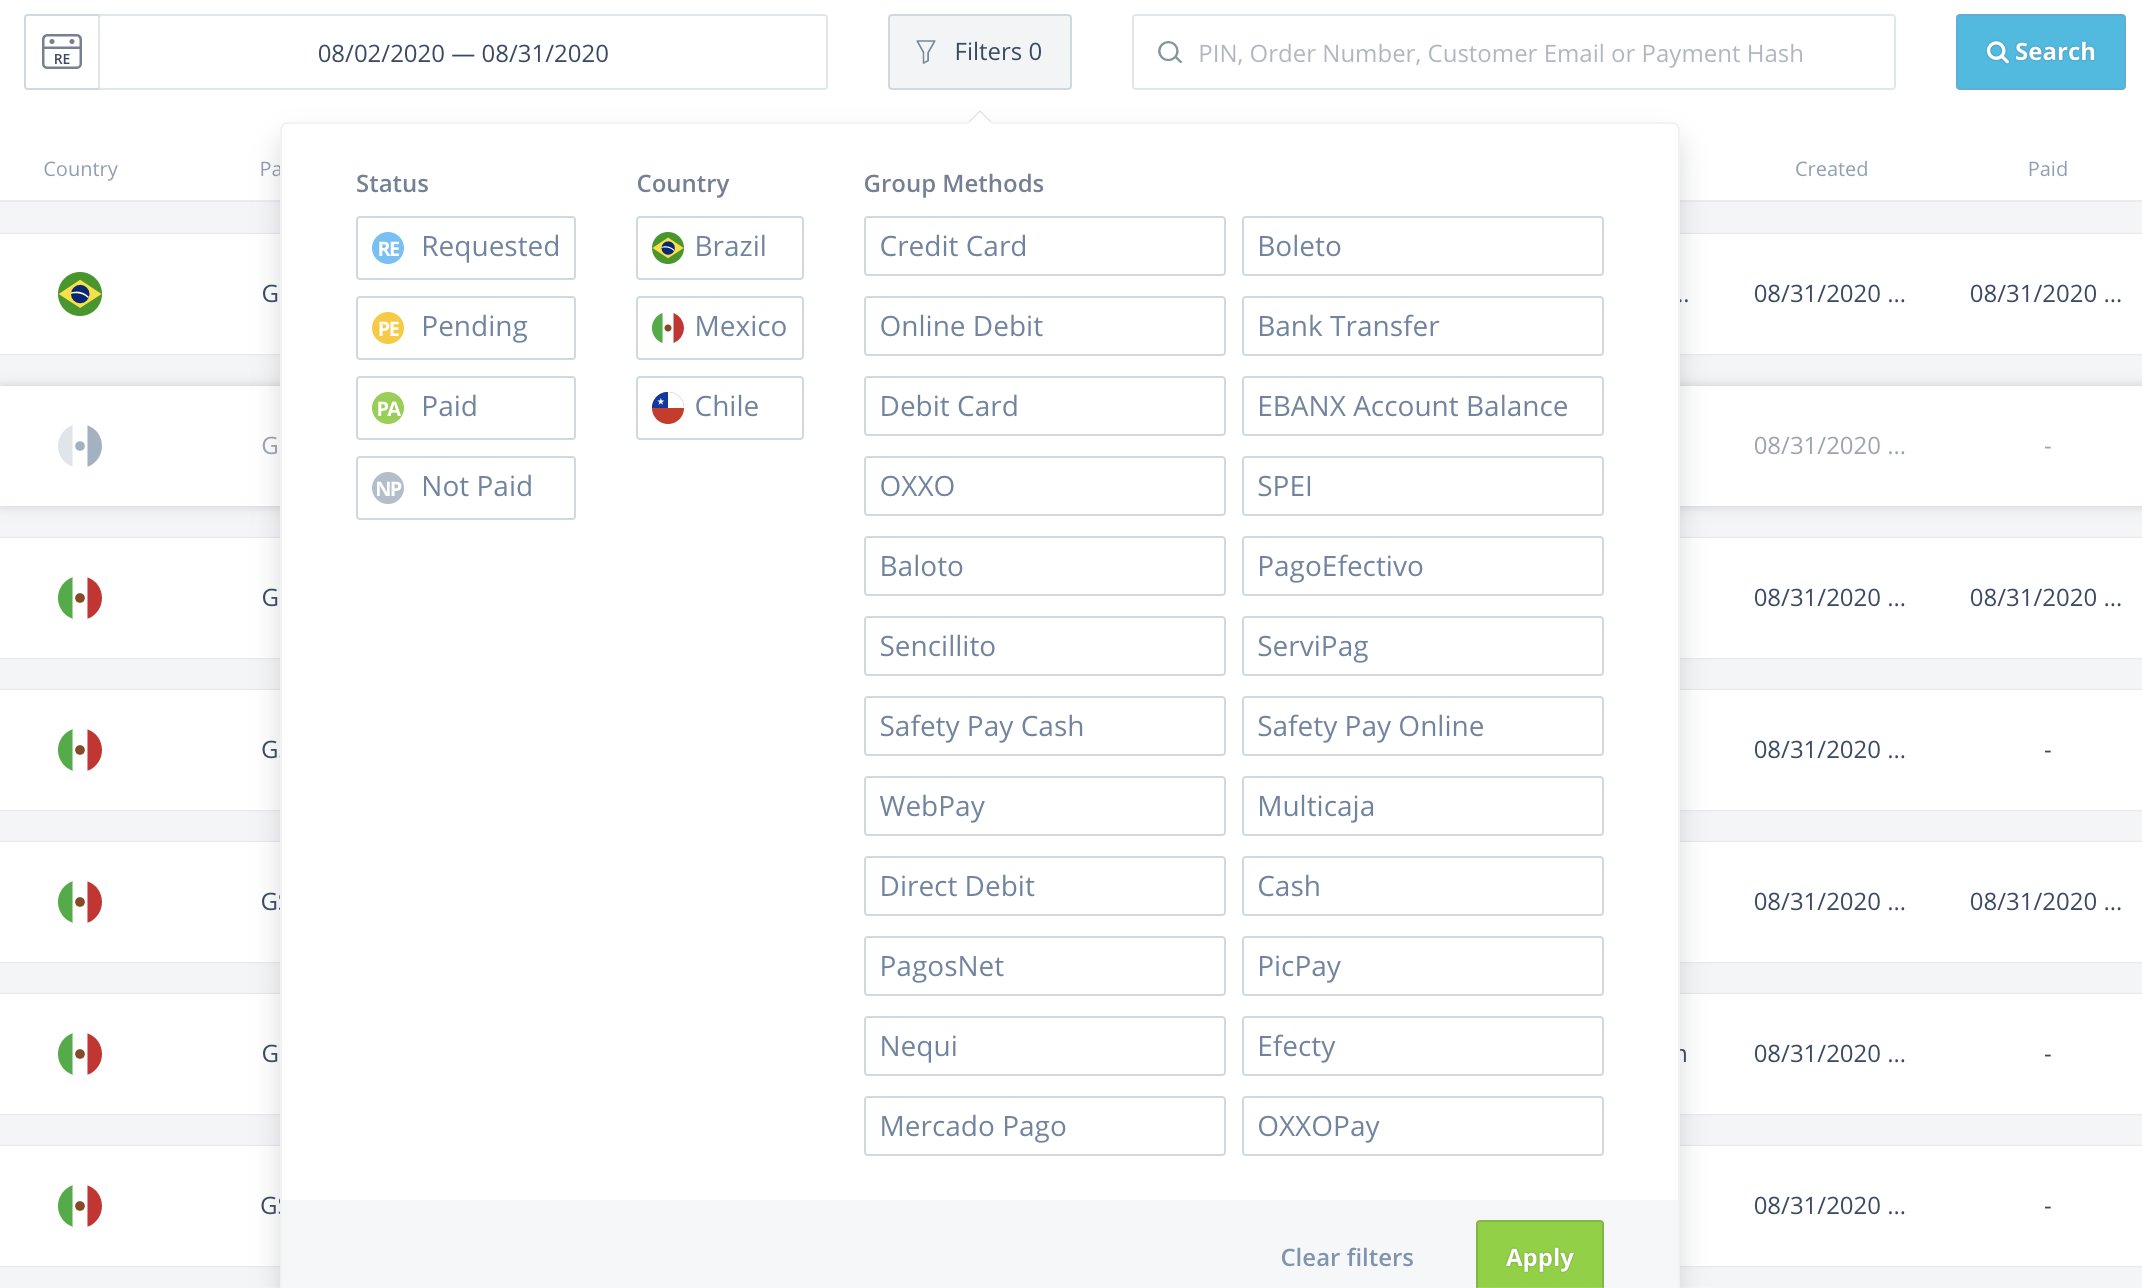
See all your payments and refund transactions either listed or in graphic format by clicking the top left buttons.
Click on each listed item to see full details.
Search specific payments or Refunds, Order Number, Customer email or Payment Hash.
At the Payment sub-menu you can filter by Country, Payment Method or Status.
Filter a specific time period.
Export the lists in CSV or XLSX format.
Chargeback Disputes
- See all chargebacks transactions.
- Dispute the chargebacks with the reason code "Commercial disagreement".
- Keep up with the chargeback dispute status.
- Filter and look into the tooltips to understand more about the information shown on the screen.

Settlement Screen
Access all your Settlement Preview, Details, History and request your Settlement this menu. Divided into two sub-menus with the following:
Request Settlement
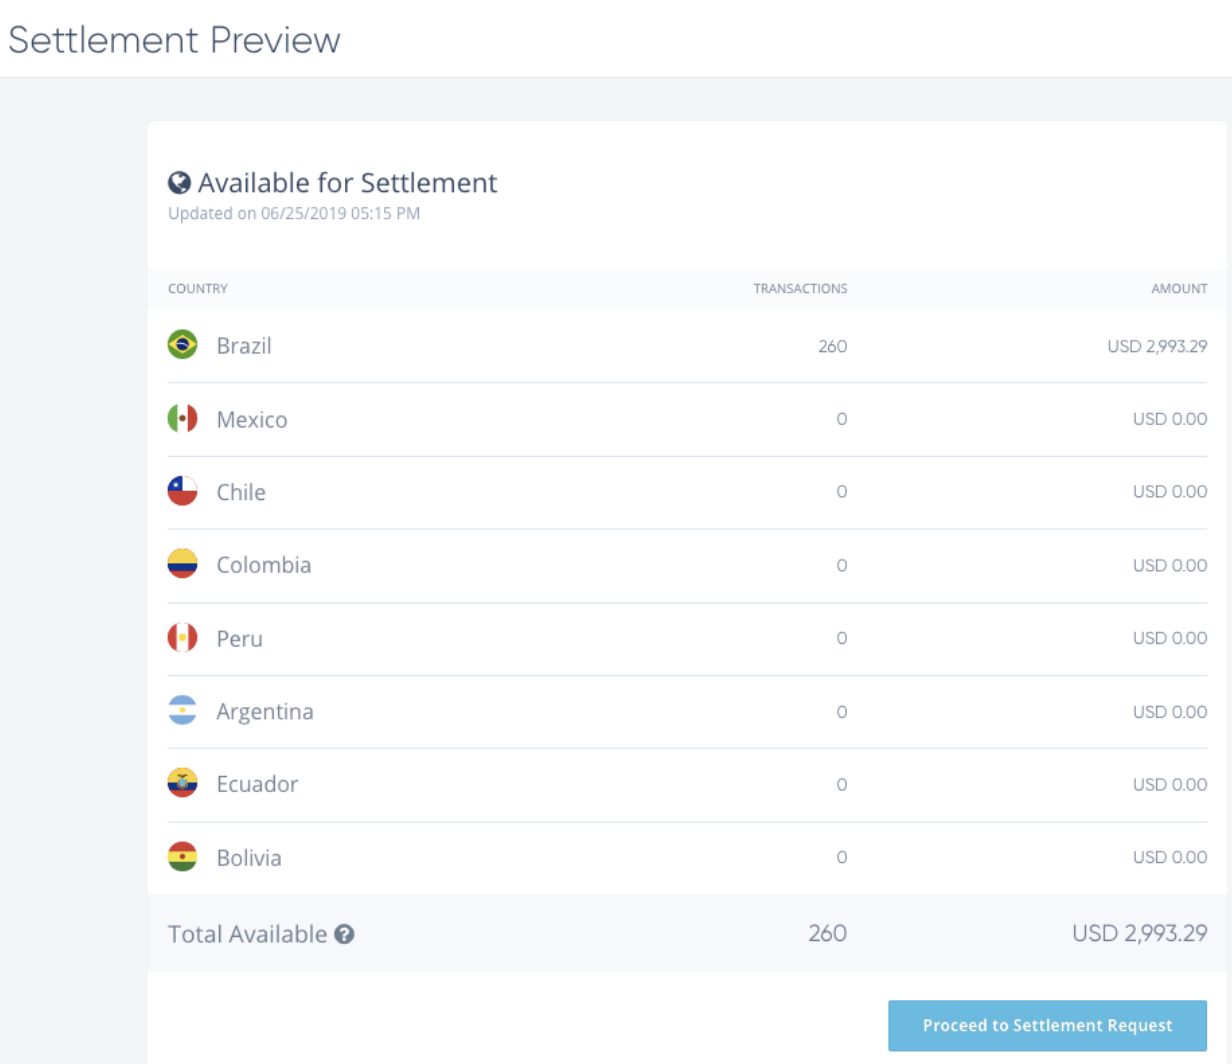
Settlement Preview
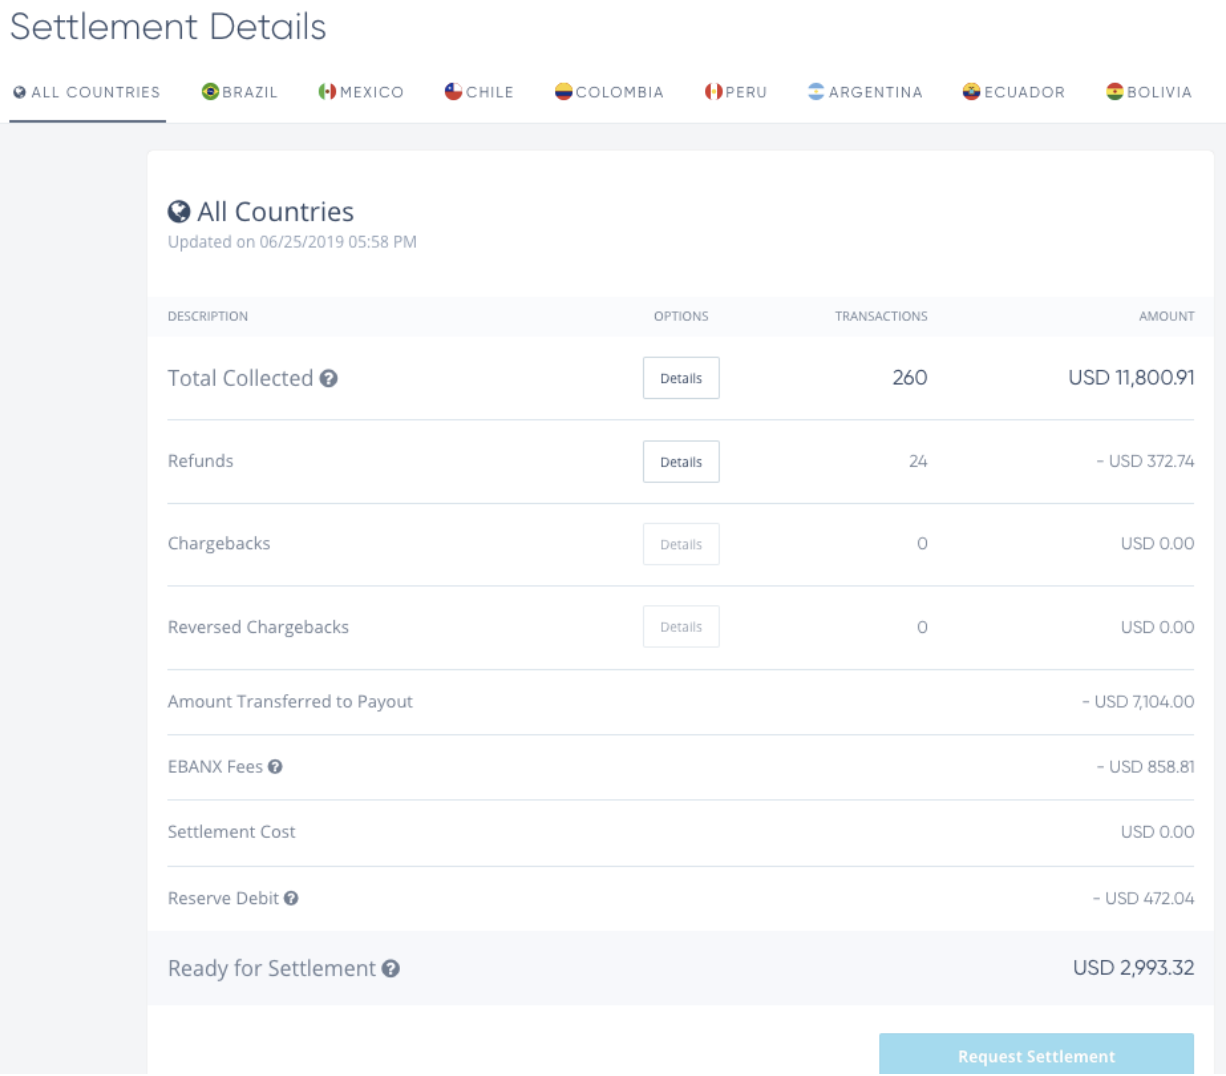
See all the amounts available and pending for settlement. Click on View Details to simulate a settlement and see the regarding Total Collected, Refunds, Chargebacks, Reversed Chargebacks and fees.
Settlement Details
Click in Request Settlement to request one for all countries or a specific one.
History
- Check all your Settlements in both list or graphic format.
- Filter each Settlement by Settlement Code, time period or status.
- Click on each Settlement and you can see full details of the settlement such as the amount processed and the fees applied to your Settlement.
- You can also export a report about your settlement.


Logs Screen
This menu will show all communication records of your transactions when it comes to our system and yours.
Direct API
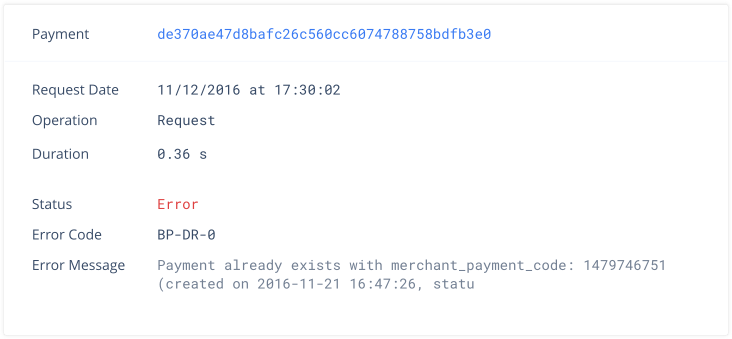
Here you will see all the records coming to our API from your platform. Merchants who use our external Checkout won’t see any content in this area. You can find a specific log by searching with the payment number and filtering.
Notification
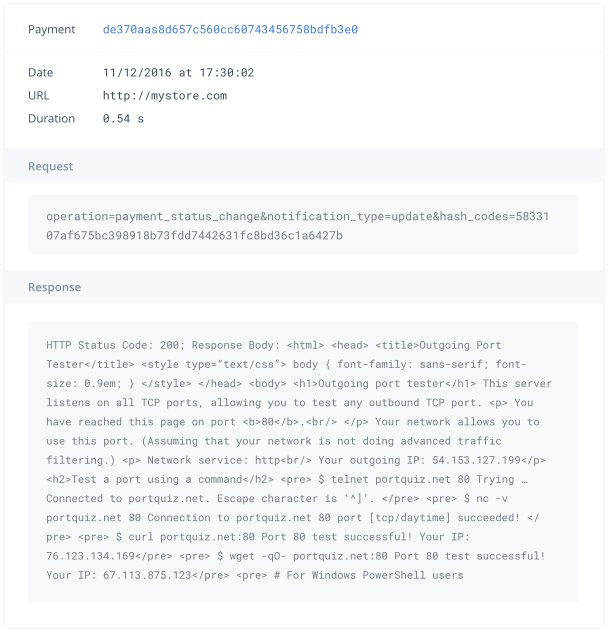
Here you will see all the records coming from EBANX to your platform notifying changes on your transactions. If you have not configured your notification URL, you won’t be able to see any notification in this section. To configure your URL, go to Account Settings by clicking on the name of your user on the top right of the page, than go to Integration and Service URLs.
Settings

Now you can find your Settings under your User Name on the top right corner of your screen. Account Settings, Help & Support and Sign Out are now under your username. In Account Settings you will find:
General configuration: Change and update at any time your company Name, logo and login information.
User configuration: Give permission to the different user inside your company, there are 4 different categories of users. Click on each category to understand how they work.
Integration: Here you will find your test and integration Keys, such as your test and live Service URLs.
Preferences: Set your timezone and your default merchant in case of more than one.
Okta Oauth Integration
The EBANX Dashboard offers SSO(Single Sign-on) integration via Okta using the Oauth2 protocol as Custom App.
By design, we offer Oauth2 authentication only to bearers of specific corporate domains.
It enables access to previously-approved customer users bearing specific enterprise e-mail domains(i.e.: “@your-company.com”) to utilize Okta as Authentication provider. Oauth login users are required to log in via SSO and cannot (i) login via Login and Password and (ii) create or change passwords.
Customers integrated via Okta are allowed to have users with and without(i.e.: Login and password) SSO simultaneously. The integration requires users to be pre-authorized to access the EBANX Dashboard both on Okta and on the EBANX Dashboard itself(i.e.: the user must be registered and assigned to the app at the Okta directory and registered at the EBANX Dashboard with the same e-mail address).
1. Before you start
Before the integration, with the EBANX Dashboard using OKTA you are strongly advised to get in contact with one of our personnel to discuss
(i) How does the SSO work and how may we help your business,
(ii) Designated key people in your organization that will interact with our team during the integration,
(iii) Your company's familiarity with integrations,
(iv) Feasibility of integration given any boundary conditions at your Okta settings and directories,
(v) Expected deadlines,
(vi) Align expectations and outcomes.
2. Permissions and Roles on EBANX Dashboard and SSO
Permissions and roles are managed at a different layer on the EBANX Dashboard. Performing login via Oauth or Login and password yields the same result as far as customer access. Roles and permissions are managed and still should be defined by the Permissions and Roles policies within the platform.
- Actions performed on Okta Organizations such as user management, permission granting(e.g.: assigning users to the custom app), and revoking must be done within OKTA directories.
3. How is the Integration process divided?
The integration has five main steps:
Initially, the customer side should prepare the configurations necessary at the Okta Organization:
- This is expected of your personnel to handle
Once we have all goals aligned, the EBANX Dashboard will need to be added as a Custom App in your Okta Organization. For this particular app, we will need a set of claims(i.e.: authentication and other protocol specifications, more details below in the step-by-step section).
The EBANX team will also need a list of domains to require Single sign-on from. The feature is designed for corporate e-mails and restricted to specific domains.
The integration will require your Organization directory to have users assigned to the EBANX Dashboard application. We advise creating and/or assigning to the application at least two users: (i) one user for our team to assert the integration functionality and testing and, (ii) one user from the customer personnel to assert the functionality from the customer side(REQUIRED). The users must be registered in the EBANX Dashboard with the same e-mail.
- What is expected of our team to handle
- With the proper claims(i.e.:keys, URLs...) and a user created and bound to the Ebanx Dashboard at Okta(the testing user required above), our team will handle the integration process and test the login flow.
Once the integration is complete, any user on your Okta Organization (i)assigned to the Dashboard custom app and, (ii)invited to have access to the Ebanx Dashboard, will be able to log in via SSO using their corporate e-mails.
Non-corporate e-mails are required to use Login and Password.
4. Merchant-side required configurations - Step by step.
- Create a custom app for the EBANX Dashboard at Okta: Go to Applications > Create App Integration.
- Set up the Allowed Sign-in redirect URIs to the EBANX Dashboard tenant you want to redirect your users after login.
This redirect URI route will be composed using the base URL to the EBANX Dashboard(i.e.: https://dashboard.ebanx.com, https://dashboard-latam.ebanx.com, or https://dashboard-diamond.ebanx.com - depending on the tenant), and point to the resource: '/users/auth/oktaoauth/callback'. The final result should be something as:
- To set up the Initiate login URI to allow Users to access the Dashboard via the Okta App Dashboard:
At Okta, allow the 'Login flow option' to allow 'Either Okta or App' as initiators. To get the URI for Oauth Initiation by okta(i.e. the 'Initiate Login URI'), please consult with our team. You will also need to add the EBANX Dashboard app to users' Dashboards for it to be available to your users.
Save your Client Id and Client Secret from the custom app form - The EBANX team will need it!
Take note of your OKTA URL: i.e.:
https://merchant.okta.com/- The EBANX team will need it!Please look up and take notes of the following configurations if you have any that differ from default values either by specific configurations or the usage of the Okta API management solution. In case you have any questions about the terms in this section, go to Okta Developer docs.
- okta_issuer: Okta server issuer URL.
Defaults to https://your-org.okta.com/. Case your organization uses the API management solution,
it defaults to https://your-org.okta.com/oauth2/${authorizationServerId}.
- okta_auth_server_id: In case your organization utilizes the Okta API management solution, it is the server id that we should connect to in your Okta Organization.
Defaults to Null, unless API management solution is used.
- client_options → site: Your Oauth2 server URL.
Defaults to https://your-org.okta.com/oauth2. Case your organization uses the API management solution,
it defaults to https://your-org.okta.com/oauth2/${authorizationServerId}.
- client_options → authorize_url: Your oauth server URL for authorization:
Defaults to https://your-org.okta.com/oauth2/v1/authorize. Case your organization uses the API management solution,
it defaults to https://your-org.okta.com/oauth2/${authorizationServerId}/v1/authorize.
- client_options → token_url: The URL the Dashboard will prompt for an access token once authentication is successful:
Defaults to https://your-org.okta.com/oauth2/v1/token. Case your organization uses the API management solution,
it defaults to https://your-org.okta.com/oauth2/${authorizationServerId}/v1/token.
Prepare an initial user set for testing. We advise at least two users to be granted access to the application: (i) A new dummy user for the EBANX Dashboard team to assert the integration functionality, and (ii) a personnel member responsible for asserting functionality.
Send (i) The required configurations,(ii) User credentials for testing, and (iii) E-mail domains that will login via SSO. Shortly afterward our team will start the integration!
5. EBANX team required configurations
Once we have the information from the step before, the EBANX team will start your integration with Okta. The EBANX Dashboard team will keep in contact with the designated people on the customer side for eventual additional information requests and other eventual points that need to be discussed.
6. Inviting users
- Creating via Web Interface
You can create users via the EBANX Dashboard web interface. Go to Account Settings > Users > New user. Fill in the required data, select a permissions template and click on 'create user'. The user will receive an invitation e-mail and may log in via SSO.
- Creating via spreadsheet update
Go to Account Settings > Users. Scroll down to the bottom of the page and click on Add Multiple Users. Upload your .xls or .xlsx document with the correct information and the proper permissions. Once done submit your spreadsheet and all users will be granted access and invited to the EBANX Dashboard.
7. Using the Integration
To use the integration, you can start the login via (i) the EBANX Dashboard or via (ii) Okta MyApps Dashboard.
(i) Login initiated via Dashboard: Go to the EBANX Dashboard and click on 'Login with Okta'. A new window prompting your company name will be displayed. Type your company name, and in case a match is found, you will be redirected to login. On the Okta authorization page, type your credentials to login, and you will be redirected to the EBANX Dashboard.
(ii) Login initiated via Okta MyApps Dashboard: Login At the Okta My apps Dashboard, find the EBANX Dashboard application click on it. A side panel will open with the button 'Launch App'. If you are not logged at the Dashboard, You will be redirected to the EBANX Dashboard login confirmation page for Oauth. Click on Login, you will be redirected to the Dashboard as soon as you are logged in. If you are already logged in, you will be automatically redirected to your company page on the Dashboard.
8. FAQ
1.Q: Can regular users(i.e.: without e-mail domains registered for Oauth) login normally?
A: Yes. Access is scoped and it is perfectly fine to invite non-OAuth-required users.
2.Q: My company has SSO and I can't log in using Login and Password. What now?
A: You should click the "Login with Okta” button, type your company name on the text field and continue.
3.Q: Can I log in with Google via OKTA? Am I logging in using Google or OKTA after all?
A: Yes. In the same way, Okta asserts identity for the EBANX Dashboard(i.e.: we believe when Okta authenticates your e-mail), Google also asserts identities to OKTA. This means that we do not Integrate with Google Oauth, we only let OKTA use their own Google Oauth Integration.
4.Q: I am seeing an unauthorized screen and my URL is an EBANX Dashboard URL. What does this mean?
A: Your user is present on your Organization directory, however, access to Dashboard has not been granted to you yet. Contact personnel in your company with access to the EBANX Dashboard with permissions to invite you(i.e.:give you access) to the Dashboard.
5.Q: I am seeing an unauthorized screen and my URL is an Okta URL. What does this mean?
A: Your user is present on your Organization directory, however, you don't have access to the EBANX Dashboard app. Contact your company Okta managing personnel to gain access(i.e.: be assigned) to the App. 6.Q: If I add a user to Okta, and he does not have an enterprise e-mail address(i.e.:@gmail.com), will it work?
A: No. Log in via SSO is restricted to users with enterprise e-mails that must be whitelisted on the dashboard.
Getting help
We hope this article was enlightening, but in case we’ve failed to take out your doubts you have the following options to keep on seeking for answers:
- If you’re not our partner yet and would like to know more about our prices and conditions please fill our this form and our commercial team will get in touch with you.
- In case you’re already our partner please get in touch with our support team at integration@ebanx.com.